Thursday 31 December 2009

4 Tips Increase Alexa Traffic Rank (most effective)

 4 Tips Increase Alexa Traffic Rank (most effective)Ranking of a website based on measurement of ‘reach’ and ‘pageviews’. ‘Reach’ is measured by looking at the number of global internet users who visit a particular site while ‘Pageviews’ is the total number of alexa users who request the URL of a site. Repeated requests a URL from 1 users on the same day will be counted as a single pageview.

After seeing what the meaning of Alexa, I can conclude that alexa rank of course very useful to see how much visitor web/blog that we manage all this. However, there are also some people who cons of that conclusion. They considered that the calculation of alexa ranking is not accurate and can cheat by webmasters who must have experience in that field.

If the explanation Alexa Rank Taffic official website alexa.com itself is as follows:

The traffic rank is based on three months of aggregated historical traffic data from millions of Alexa Toolbar users and is a combined measure of page views and users (reach). As a first step, Alexa computes the reach and number of page views for all sites on the Web on a daily basis.

The main Alexa traffic rank is based on the geometric mean of these two quantities averaged over time (so that the rank of a site reflects both the number of users who visit that site as well as the number of pages on the site viewed by those users).

After a couple of times search on google about how to increase Alexa Rank, so can I conclude there are four ways to improve the Alexa Ranking:

1. Alexa Traffic
The most basic step: Generating traffic as possible. Since the original idea of the Alexa rank is to determine which websites have the most traffic with the assumption, more traffic = more popular. Alexa is basically a website’s popularity ranking.

2. Alexa Toolbar (Alexa Sparky)
Using a browser that Alexa toolbar installed can improve your website rankings. Actually not only your website, every website visited by a browser that Alexa toolbar installed are also getting “value” to be taken into account in the ranking. Then, isn’t it of your website visitor is yourself? So, if you’ve installed the browser toolbar, then the addition of ranking points will occur automatically. You can install Alexa Toolbar for Firefox easily.

3. Alexa Site Widget
Install Alexa site stats widget on your website. Alexa stat this site contains javascript which deliver every visitor data (ping) to Alexa server so that Alexa statistics become more accurate. The Script can be taken at Alexa site widget. Just copy and paste. No need shame to put Alexa widget that still fat, to achieve the desired results of course there is a price to be paid.

4. Alexa Blog / Content
Write an article/post about Alexa on your blog . Webmasters and Bloggers like the ways to increase Alexa ranking. Create an article related to Alexa Ranking or some tips of Alexa.

That’s how effective way Increase Alexa Traffic Rank that is widely used by professional webmasters and bloggers. Hopefully helpful.

Friday 25 December 2009

Find Profitable Keywords for Your Online Business

Keyword Country 5 (KC2) has recently launched in beta stage. It is a free keyword research tool you can use to find unlimited number of profitable keywords and traffic attracting keywords from any niche.

http://www.keywordcountry.com/beta/

For AdSense and affiliate marketers, they can use KC5 to find profitable keywords and generate more niche ideas helpful for them to create their niche sites and blogs to make money online with AdSense and affiliate programs.

And for search engine optimizers, it lets them research what are the highly popular keywords they can target to and find semantically related keywords to include to their content pages for the purpose of gaining more search engine traffic.

multiple okut in firefox

Login with multiple ids at the same time in orkut , gmail , yahoo

To perform this trick u need firefox mozilla browser

======== Trick to Multilogin in firefox ============

Step 1:
open system properties(by right clicking my computer), choose tab advanced, click to environment variables button. in system variables section, click new. type this information to each textbox.

variable name: moz_no_remote(should be all small letter)

variable value: 1

press ok to close all windows.

step 2:
open firefox icon's properties(from desktop and quick launch). add extension -p to command line(like "c:\program files\mozilla firefox\firefox.exe" -p). press ok.

while starting firefox u have to create two separate profiles of firefox so that u can login to two accounts of any(orkut,yahoo,rediff or anything else).......
for three logins create three profiles of firefox.........

Essential Web Development Tools

Developing a successful web site takes a great deal of planning and preparation. An important part of your preparation is obtaining the essential tools of the trade.

HTML Editors

An HTML editor is a software program used to create and edit HTML documents.

Although some Internet marketers prefer to write their own HTML code, most prefer to use an HTML editor, as it can greatly simplify a somewhat difficult process. However, using an HTML editor has its disadvantages, as some editors have a tendency to add a lot of unnecessary coding and may not support the latest technologies.

Whether you will be writing your own HTML or using an editor, taking the time to learn HTML is very important. Not only will you gain your independence, but you'll also have the ability to add special effects that many HTML editors don't support.

Here are some popular HTML editors:

Macromedia Dreamweaver
http://www.macromedia.com/software/dreamweaver/
A popular WYSIWYG (What you see is what you get) HTML editor. Great for beginners and advanced users alike.

Coffee Cup
http://www.coffeecup.com/html-editor/
A popular HTML editor that's great for beginners as well as advanced users. Includes a built in browser that will enable you to instantly preview your HTML as you go.

Hot Dog Professional
http://sausage.com/products/index.html
Three HTML editors, including HotDog Junior for children, PageWiz for the novice user and Professional for advanced and budding webmasters.

Text Editors

A text editor is a software program used for editing plain text that doesn't add any special formatting.

If you're considering writing your own HTML code, you'll need a good text editor. Although it will certainly be more time consuming, your code will be much cleaner and can reduce your file size considerably.

In addition to using a text editor to write HTML, it can also be used to edit scripts and write articles.

If you have a Windows operating system, Note Pad is the preferred text editor. It should already be installed on your computer.

Although Note Pad is a great little text editor, it can't handle large files and is much better suited for smaller jobs. You may find that you'd like an editor that is more powerful, such as:

NoteTab Pro http://www.notetab.com/
TextPad http://www.textpad.com/

FTP

File Transfer Protocol, better known as FTP, is a procedure used to upload and download files to and from your web server.

Although many HTML editors will enable you to edit and transfer pages to your server, an FTP program is still an essential tool, as you must have complete control over the files on your server.

An FTP program will enable you to upload scripts, set file permissions, create folders and transfer files to and from your server.

In order to use FTP, you'll need to download and install a software program on your computer. The most widely used FTP program is WS FTP Pro http://www.wsftp.com/

Graphics Editor

A graphics editor is a software program that will enable you to design and edit graphics.

Graphic design is an intimidating subject for many Internet entrepreneurs. However, most of us must learn some basic design techniques in order to avoid the high costs of hiring a professional designer.

The most popular program used by Internet marketers is Paint Shop Pro. This powerful program is the only program you'll need to design professional looking graphics.
http://www.jasc.com/

Zip/Unzip Software

A Zip file is an "archive" of one or more files compressed into one file for easy distribution.

Zip files are used to compress and transport file archives over the Internet. It is the preferred method used for electronic file distribution, as rather than downloading several different files, you can simply download one Zip file. In addition, the download time will be minimized, as the files within the Zip archive are compressed.

Once a Zip file is downloaded, it can be easily opened and extracted (unzipped) with a Zip/Unzip software program.

Although there are many Zip software programs available on the Internet, WinZip is the most popular. WinZip makes working with file archives simple. It features an easy point-and-click, drag-and-drop interface for viewing, extracting, adding, deleting and testing archived files.

You can download a fully functional evaluation version here:
http://www.winzip.com/download.htm

Email

Although most Internet Service Providers include email accounts for their customers, these accounts aren't adequate for an Internet business -- especially if you get a large amount of email. Not only do the email addresses contain your ISP's name, but they are also very limited on features and options.

The two most popular email clients used online are Outlook and Eudora. These programs will enable you to download email from your server and offer features, such as sorting and
filtering, and will enable you to easily organize your email messages. What's more, your email address will be your own domain -- not someone else's.

Eudora
http://www.eudora.com/
Outlook
http://www.microsoft.com/

Your webmaster toolbox will play an important part in your success. Take the time to ensure your toolbox contains these essential tools and you'll be well on your way to designing a professional web site.

Top 3 Rapidshare File Search Engines

Rapidshare.com is undoubtedly the best one click file hosting site in the web today,originally Rapidshare.de is a German file hosting company which change to rapidshare.com,though it upgraded most of it's features from looks and user interface,it still lacks a file search engine.

It's one of the most popular web destinations for downloading movies songs ebooks etc.but its really hard to find these links on the web this is where Rapidshare search engines really help.I will introduce you to some of the best Rapidshare file search engines on the web


I went through a lot of them,and found just 3 which gave me good search results along with less ads.here they are


1)Rapidlibrary - Rapidlibrary.com


2)Rapid Burner - Rapidburner.com


3)Rsfind - rsfind.com

Download from a paypal site without paying a penny.

Just a little basic html tip for those who are trying to download an application from sites which has an paypal order page & link to start you off.

Use a proxy when you try this to hide your ip as some sites will record your ip when you connect for security.

1) Rightclick your mouse (ctrl+click) viewsource and open the source of the site in an a texteditor
2) Search for the word "return"
3) Next to it you can find the url for the thank you page
4) Copy the url and paste it in your browser and you will see the download link

This works only if you can download instantly after payment, it will not work if the link needs to be emailed to you.

You can try it here to start with:
Code:
http://www.ramphelp.com/halfpipe.html

About half way down the page you will find:


Copy the link into your browser and download.

How to mount an ISO image in Windows VistaHow to mount an ISO image in Windows Vista

The freeware utility from Microsoft to mount ISO Images doesn't work in Windows Vista. Thankfully there's another utility that does.

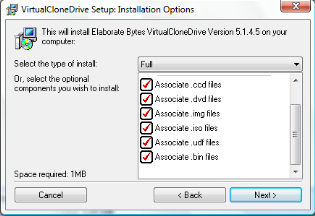
The utility that we will use is called Virtual Clone Drive. This utility will let you mount .ISO, .CCD, .DVD, .IMG, .UDF and .BIN files. Download the utility and start the setup process.

Select Yes or OK at the hardware prompt and continue. You might have to restart your computer. Now you should be able to mount any ISO image by just double-clicking on the file. Note: If you are going to reinstall this utility, make sure you uninstall it first, or you'll BSOD yourself repeatedly.

This utility does not work on Windows Vista 64 bit edition.

Alternatives

  • Virtual CD-ROM (Microsoft) - This utility does not work in Windows Vista
  • MagicDisk - This is a nice, free utility, but it isn't very easy to install in Vista64.
  • Alcohol 52% - Free version of Alcohol 120, but it bundles a browser toolbar that they claim isn't spyware. It's unacceptable.
  • Daemon Tools - Well known tool, but the latest version installs spyware on your computer, and the old version doesn't work in Vista.

At this point, Virtual CloneDrive is by far my favorite free utility.

Download Virtual CloneDrive from slysoft.com

Speed Up SATA Hard Drives & USB Drives In Windows Vista

Window Vista has built in support for SATA and external drives, but they seem to be slow because the advanced write cache features aren’t automatically activated. With just few steps you can enable them and get a much faster response.

First you need to go to the Device Manager which you can go directly by just typing device in the start menu search box or just type in devmgmt.msc in command line.

Now open the Disk drives section and right click on your hard drive. Now click on the Policies tab and you’ll find this dialog box:


Now click the checkbox for Enable advanced performance, and you are done.


Write caching isn’t enabled by default as removing devices directly without using the “Safely remove removable device”may lose your data, so be cautious when enabling this options. But enabling this option also when speeding up performance significantly when writing to the disk.


Now select the external drive and double click it to open up the properties screen. Then
just change the setting to “Optimize for performance” and hit OK to continue. You’ll have to reboot for all the settings to take effect. Next time you boot into Windows Vista you’ll see faster bootup times and better disk writing performance.

Increase Hard Disk speed in Windows

If you like to increase/optimize your Hard Disk I/O - read/write speed without buying expensive software utilities to do that job or changing the HD, just follow next steps. With doing these steps you will increase Hard disk speed (depends of manufacture and specification, but its worth to try). The most speed improvement is visible with IDE drives; however there are reports that this tweak also does good for SCSI disks.

In any case, it won't harm your system, so try it yourself and let me know what you find!

Steps:

1. Run SYSEDIT.EXE from the start & then Run command.
2. Expand the system.ini file window.
3. Scroll down almost to the end of the file untill you find a line called [386enh].
4. Press Enter to make one blank line, and in that line type
5. Irq14=4096 (note: This line IS CASE SENSITIVE)
6. Click on the File menu, then choose Save.
7. Close SYSEDIT and reboot your computer.
8. Restart windows!

The speed improvement will be noticed just after the system reboots, any system info. software can be used to check the improvement.

Virtual Memory too low Warning Trouble in win xp and vista

When there is less physical memory than needed, then some virtual memory (virtual RAM) is created on the disk. When there is a limit set to the size of virtual memory usage and there is not enough of it present there is a warning that frequently comes “Virtual Memory too low”.

Solution 1 :

This problem occurs when physical RAM + Virtual RAM (usually created on hard disk) together are not sufficient to take care of the currently needed RAM size, or this situation is about to arise. This usually happens when some fixed upper limit for Virtual Memory has been set. To solve this problem, you can either upgrade you physical RAM on your computer (recommended), or you can set the Virtual Memory to system managed size or you can do both. Setting Virtual Memory to system managed size means windows will set it to higher size whenever needed automatically,for this,


Right click on My computer --> goto properties, goto advanced tab, click on performance settings, now click on advanced, now click on advanced, now click on change button for Virtual memory.


On this screen select the System managed size, press OK. After this re-start your computer. This will solve the virtual memory too low problem.

Solution 2:
Recommended solution is to upgrade your physical memory (RAM) according to requirements of the kind of applications that you run on your computer. If you upgrade RAM or not, the following procedure will help prevent this warning by increasing the virtual memory limit.
  • Right click on My computer icon and click properties.
  • This will show system properties window. Click on a advanced tab and click on the settings button under heading performance.
  • This will open performance options window. Click on advanced tab and click on change button under heading virtual memory.
  • Check if the space available is set to some custom value or double the RAM size ?
  • If it is not double the RAM memory size , then select the size option set the virtual memory size double the RAM Size and press set button and press OK button.
  • Restart the computer.

Download Youtube video in .mp4 format

  • Download Youtube video in mp4 format without using any software or any website using a simple javascript.
  • This script let you download Youtube video directly from the website without any delay.
  • Below is the code to download a video from the you tube,copy-paste this code into the address bar when your desired video starts buffering.Isn't it amazing script??? I have attached a screenshot of the video also.
  • copy this script into address bar:

javascript:if(document.location.href.match(/http:\/\/[a-zA-Z\.]*youtube\.com\/watch/)){document.location.href='http://www.youtube.com/get_video?fmt='+(isHDAvailable?'22':'18')+'&video_id='+swfArgs['video_id']+'&t='+swfArgs['t']}

Wednesday 30 September 2009

Download Multiple Free Files From Rapidshare

Download Multiple Free Files From Rapidshare


Rapidshare allows to download only a single file at a time with free account. If you want to download multiple files at the same time, you need to buy a premium account but now you can download multiple files from Rapidshare free account without paying anything with RapidShare Download Accelerator.


With RapidShare Download Accelerator, you can add all the files you'd like to download, and it will do all the annoying work for you. Now you can just sit back and watch your files download without paying a dime.

Links : Download Rapidshare Download Accelerator

Adding Windows Vista Fonts In Windows XP & Win2000

If you are bored of the old XP and Win2000 fonts, then here comes Windows Vista to the rescue. It has some cool and sexy fonts like Candara, Consolas, Calibri, Cambria, Constantia and Corbel, etc. Now you can install these in Windows XP and Windows 2000 as well.
Just follow the instructions given below:

1. First go here and download the Microsoft Compatibility pack (MCP). The MCP is a free utility that allows you open, edit, and save documents, workbooks, and presentations in the file formats new to Microsoft Office Word, Excel, and PowerPoint 2007.

2. Save to desired location and install it.

3. That’s it now you’ll have these vista fonts in all office applications including the previous fonts.

Remove Autorun Virus Infection - Solution for USB, PC & Laptops.

Nowadays, there is a new problem that is cropping up in almost all schools,colleges, hostels etc. where the malicious Autorun Virus is Creating Havoc by spreading to Laptops and PC through USB Drives etc.

How to Stop the Autorun PC Virus Infection ?

The free Panda USB Vaccine allows users to vaccinate their PCs in order to disable Autorun completely so that no program from any USB/CD/DVD drive (regardless of whether they have been previously vaccinated or not) can auto-execute. This is a really helpful feature as there is no user friendly and easy way of completely disabling Autorun on a Windows PC.


Panda USB Vaccine is a 100% free utility. Its tested under Windows 2000 SP4, Windows XP SP1-SP3, and Windows Vista SP0 and SP1.

Download : Click Here to get Panda USB Vaccine

Speed Up SATA Hard Drives & USB Drives In Windows Vista

Window Vista has built in support for SATA and external drives, but they seem to be slow because the advanced write cache features aren’t automatically activated. With just few steps you can enable them and get a much faster response.

First you need to go to the Device Manager which you can go directly by just typing device in the start menu search box or just type in devmgmt.msc in command line.

Now open the Disk drives section and right click on your hard drive. Now click on the Policies tab and you’ll find this dialog box:


Now click the checkbox for Enable advanced performance, and you are done.


Write caching isn’t enabled by default as removing devices directly without using the “Safely remove removable device”may lose your data, so be cautious when enabling this options. But enabling this option also when speeding up performance significantly when writing to the disk.


Now select the external drive and double click it to open up the properties screen. Then
just change the setting to “Optimize for performance” and hit OK to continue. You’ll have to reboot for all the settings to take effect. Next time you boot into Windows Vista you’ll see faster bootup times and better disk writing performance.

How do I track visitors to my blog

Many bloggers are interested in knowing how often their blog was viewed. What you need is a hits counter. You can get a free hit counter here at StatCounter.com. After you sign up for an account, you will be taken through a series of steps to generate codes to paste into your template. You will have to provide a title and give the url of your blog, choose a category and select from a series of options. You may just accept the default if you want a counter similar to what you see at the bottom of this page (you may also select the invisible option). There will be just one option where no default is given and that is whether your website uses frames. Select NO. There is a further option of whether you want the script generated for your counter to be XHTML compliant or not. For the New Blogger, I have earlier found that leaving this unticked can give a working counter. But if you are using a New Blogger template, it is probably betting to tick that option. When the codes are generated, highlight it and copy the codes.


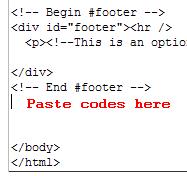
Sign into Dashboard, select the relevant blog, click the TEMPLATE tab to get to the template editor to edit the template. Paste the codes after the tag and before the tag (this is for those using the old classic Blogger template. If you are using the New Blogger template, see update below). Which part of the template will depend on where you want the counter displayed. To put it in the bottom as on this page, paste it just before the tag as shown in the codes above where you see Paste codes here. This section will be almost at the end of the template. Scroll down the template editor and you will see it

Solution : Rapidshare Download Trick

Many peoples have lots of problem in downloading from Rapidshare.
this post is specially for my broadband user friends.

1. Click Start
2. Click run
3. In the run box type "cmd" (without quotes)and click OK
4. When the command prompt opens type the following and hit enter after every new line.

ipconfig /flushdns
ipconfig /release
ipconfig /renew
exit

Explanation : As all Broadband users has dynamic ip they can simply change their ip address. by the commands mentioned above.


If you are bore of typing this much Command then simply make a batch file.
Creating a Batch file.
Open a notepad. type following in it.

@echo off
ipconfig /flushdns
ipconfig /release
ipconfig /renew
@echo on

Save this file with name you like and the extension as bat.
now simply execute this file.
Enjoy the Download.

Tweak IE7 to run Faster

There are 4 tweaks for IE7 so that the loading of site is faster. Doing these tricks will not hamper your security or setting changes. These tricks are done only on the unnecessary overheads on the IE7.

1) Turn off Phishing Filter : This feature is only protective to you to access the junk or malefic sites, it has been found that this feature slows down the loading of webpage. I think one can surf without this extra costly protection. It can be disabled here in IE7:
Tools > Phishing Filter > Turn off automatic website checking, there turn it off.

2) Disble automatically checking for RSS feeds. Most users are not availing this facility provided in IE7, so it's better to turn it off. How to do it:
Tools > Internet Options > Content > Feeds > Settings > uncheck all the boxes shown there.

3) Remove "ClearType" useage in IE7, it will slow IE7 performance. Disable the Cleartype in IE7:
Tools > Internet Options > Advanced > find the option "ClearType for HTML*" > uncheck that.

4) Disable the "SSVHelper Class plugin": This plugin causes browsing delays, do it here
Tools > Manage Add-ons > Enable or Disable Add-ons > Select "SSVHelper Class", click the Disable button, and then click OK.

Show Hidden Files and Folders not working?

Show Hidden Files and Folders not working?..... If we selecte the radio button “Show hidden files and folders” and then press Ok.. the changes would just disappear upon opening the dialog again. It was probably some virus attack after which the Windows registry was not being updated properly. So here is what methods to restore it back. There are so many methods to restore back the registry. If one method is not working, please try another one.

Method 1:

Go to registry editor by running regedit in the run box.
Go to this key:
HKEY_CURRENT_USER\Software\Microsoft\
Windows\CurrentVersion\Explorer\Advanced


In the right hand area, double click hidden and change the value to 1.

Now you’re all set to go. Check it in your tools menu if the changes have taken effect.

Method 2:

1. Click “Start” -> “Run…” (or press Windows key + R)
2. Type “regedit” and click “Ok”.
3. Find the key: HKEY_LOCAL_MACHINE\SOFTWARE\Microsoft\Windows\CurrentVersion\Explorer\
Advanced\Folder\Hidden\SHOWALL
4. Look at the “CheckedValue” key… This should be a DWORD key. If it isn’t, delete the key.
5. Create a new key called “CheckedValue” as a DWORD (hexadecimal) with a value of 1.
6. The “Show hidden files & folders” check box should now work normally. Enjoy!

Method 3:

1- Click Start –> Run –> regsvr32 /i browseui.dll –> enter

A confirmation message will appear like given below

2- Click Start –> Run –> regsvr32 /i shell32.dll

Wait for the confirmation and click OK.

regsvr32-shell.dll.png

regsvr32-shell.dll.png

Method 4:

If none of the above methods work, please download our Smart Virus Remover from here:

http://www.technize.com/?dl_id=6


Using this Virus Remover please restore your Windows settings and your show hidden files and folders will be set to default.

Please spare a few moments from your precious time and tell us about your experiences.


Thursday 3 September 2009

Increase the speed of your internet connection without a new modem

As more and more people get quick connections to the internet, such as cable or ADSL, it becomes apparent to the user of a simple dial-up modem that the World Wide Web can quickly turn into the World Wide Wait. Here a trick that can help speed up your current modem without shelling out the big bucks.

There is a setting located in your windows registry called the Maximum Transfer Unit (MTU). This determines the size of the packets of data sent between your and your server. In Windows 95, this setting is has a value of 1,500 bytes when the actual size of internet packets is 1,000 bytes. This can sometimes slow things down. To remedy the situation, simply follow these steps:

In the registry editor (Start > Run > regedit.exe), navigate to HKEY_LOCAL_MACHINE\System\CurrentControlSet\Services\Class\NetTrans. In the NetTrans folder you should find another folder named "000x" in which x represents a fourth digit. Right-click on the "000x" folder and select New and StringValue. Rename the item that appears in the panel on the right side to MaxMTU, then double-click it to bring up the Edit String box and give it a velue of 1002.

Remember to keep playing with the MaxMTU value until you feel that your internet connection has greatly sped up. Some people report huge speed gains using this tricks, while others hardly notice a difference. In any case, it's definetly worth a try.


Make Your PC Run Faster

Introduction

If you find your PC is slower at handling everyday tasks it may be because over time, computers get cluttered with unnecessary files that need cleaning out. A slow PC can also be because your software or hardware is outdated, but there are certain steps you can take to improve performance.

This guide shows you how to give your slow PC a speed boost and also to keep your computer free of clutter.

Causes Of A Slow PC

There are many possible causes of a slow PC. Because your computer is constantly working with files - moving, copying and deleting from place to place - it will eventually get cluttered with leftover files, some of which are not needed and just take up valuable disk space. You only have a certain amount of disk space available on your hard disk, and as it fills up the computer can begin to struggle to find room to perform its tasks.

If your PC crashes or freezes up, it may be a symptom of a slow or cluttered PC.

The brain of your computer is the Processor, and it may be that your processor is too slow to run today's demanding software. The processor can also struggle if you have multiple programs running at once - for example, if you have Word open to compose a letter while downloading a file from the Internet and also playing a song through your media player.

RAM is the temporary memory the computer uses to do its calculations. If you do not have enough RAM, your programs will run slowly.

Other components of your PC can contribute to poor performance, particularly your Graphics Card when it comes to running media and games software. Some hardware needs special programs called Drivers and these need to be kept up to date.

You may also have programs running in the background using up memory that you are unaware of, and in some cases, the problem may be a malicious program such as a virus or spyware.

Solutions

The following is a list of tweaks and tips that can be used to help improve the performance of your PC.

Maintenance

Sometimes, slowdown is caused by physical problems with your PC and its hardware. One example is your PC becoming too hot. It may be that there is a build up of dust which is preventing the cooling fans from doing their job. Your PC should be positioned in a cool place and its air vents should not be blocked.

Always turn off and unplug your PC before you clean it. A can of compressed air can be used to blow out the dust.

Like any piece of equipment, hardware components can start to wear out over time and eventually they will need replacing, usually with a newer model. You should make sure after replacing or upgrading components such as RAM memory or Graphics cards, that they are firmly in place in their slots.

Remove Unwanted Programs

There is a lot of software on the average PC which is unnecessary, and has usually been installed and then forgotten about over time. It is good practice to clean your PC of unwanted programs regularly.

Click on the Start menu then Control Panel. Switch to Classic View if you are in Category view, and double-click Add or Remove Programs. Look for programs that you don't use anymore, click to select them and then click the Remove button to uninstall them.

When your PC starts, Windows loads lots of programs including some you may not be aware are running. Often, these are necessary so that Windows and security software such as anti-virus and firewall can function properly. Sometimes, however, programs that are not necessary can be running in the background using up memory.

Hold the CTRL and ALT keys down and then press the DELETE key once. This brings up the Windows Task manger Window which allows you to see at a glance all the programs currently running on your PC. The Applications tab will list programs such as Internet Explorer, Word and any folders you have open. Click to select a particular program and then click the End Task button to stop it.

Another way to stop a program running is if it has an icon on the Taskbar. Usually you can right-click the icon and select to Quit, Disable or Shutdown.

These methods will stop the program running for now, but it will probably start up again when you restart your PC. To prevent it from running completely, you may need to remove it from the list of programs Windows is instructed to run on startup.

To do this, click on your Start menu and then on Programs. From your Programs List, hold your mouse over Startup to see the programs currently set to start when Windows does. Right-click any of the programs and click Delete to remove them from startup.

However, not all startup programs are shown in the Startup folder. To see the others, click Start menu then Run and type 'msconfig' then click OK. This brings up the System Configuration Utility window. Click the Startup tab then un-check the boxes next to any programs that you don't wish to run automatically when Windows starts.

Disable Unnecessary Processes

The Applications tab in Windows Task Manager only shows the main programs that are running. However, this is not everything: there are also various Processes that run too. Click on the Processes tab to see them.

Many of the processes listed in Task Manager will be legitimate tools required for Windows and other programs to run properly. But you may also find some here that you don't need (and sometimes you may find a process belonging to a harmful virus or spyware program).

The information given here shows you the name of the process and also how much processor (CPU) time it is using up as a percentage of the total available. You can also see the amount of memory the program consumes.

You can right-click on any process and choose End process to stop it running temporarily, but it will most likely start up again when you restart your PC. You should be very careful when ending a process that you do not stop a process that is required by Windows.

You can identify what a process is for by using the Web. Type the name of the process, such as "svchost.exe" into a search engine and see what people have to say about it. If they say it is not required it should be OK to stop it. They may also give instructions on how to remove it permanently so it does not reappear in future.

There are many useful web sites for identifying processes, including:

  • www.liutilities.com
  • www.processlibrary.com
  • www.neuber.com

Remove Malicious Programs

It is important that you use up-to-date security software to detect and remove malicious programs.

Virus programs can slow down your PC and cause unwanted behaviour, even damage to your data

Thursday 11 June 2009

How to hide files in JPEG

Using a simple trick in Windows, you can actually hide a file inside of the JPG picture file!

You can actually hide any type of file inside of an image file, including txt, exe, mp3, avi, or whatever else. Not only that, you can actually store many files inside of single JPG file, not just one! This can come in very handy if you need to hide files and don’t want to bother with encryption and all that other technical stuff.

In order to accomplish this task, you will need to have either WinZip or WinRAR installed on your computer. You can download either of these two off the Internet and use them without having to pay anything. Here are the steps for creating your hidden stash:


--> Create a folder on your hard drive, i.e. C:\Test and put in all of the files that you want to hide into that folder. Also, place the image that you will be using to hide the files in.

--> Now select all of the files that you want to hide, right-click on them, and choose the option to add them to a compressed ZIP or RAR file. Only select the files you want to hide, not the picture. Name it whatever you want, i,e. “Hidden.rar”.

--> Now you should have a folder with files, a JPG image, and a compressed archive


--> Now here’s the fun part! Click on Start, and then click on Run. Type in “CMD” without the quotes and press Enter. You should now see the command prompt window open. Type in “CD \” to get to the root directory. Then type CD and the directory name that you created, i.e. “CD Test“.


--> Now type in the following line: “copy /b DSC06578.JPG + Hidden.rar DSC06578.jpg” and press Enter. Do not use the quotes. (we assume thet the jpeg image is named DSC06578.JPG )


Just make sure that you check the file extension on the compressed file, whether it is .ZIP or .RAR as you have to type out the entire file name with extension in the command. I have heard that some people say that they have had problems doing this with a .ZIP extension, so if that doesn’t work, make sure to compress to a .RAR file.

And that’s it! The picture file will have been updated with the compressed archive inside! You can actually check the file size of the picture and see that it has increased by the same amount as the size of the archive.

You can access your hidden file in two ways. Firstly, simply change the extension to .RAR and open the file using WinRAR. Secondly, you can just right-click on the JPG image and choose Open With and then scroll down to WinRAR. Either way, you’ll see your hidden files show up that you can then extract out.


Thats it you're done.

Firefox Increase the Number of Results in the Address Bar

Increase the Number of Results in the Address Bar

By default the address bar will always show 12 results in the drop-down menu, which is probably more than enough for most people. If you prefer to see more (or fewer) results you can alter how many items can be displayed with the following setting:

* Name: browser.urlbar.maxRichResults
* Preference Needs to be Created: No
* Preference Type: Integer
* Default Value: 12
* Possible values:
o The number of results you would like to appear in the address bar drop-down menu.

Firefox Session Restore Saving Frequency

Session Restore Saving Frequency


Whenever Firefox crashes it will try to restore all of your open tabs to the way they were. This has come in handy several times for me before, but sometimes I notice that it isn’t able to restore all of my tabs for me.

That’s because Firefox, by default, only saves the session restore data every 10 seconds, but you can configure that time interval to whatever you would like.

* Name: browser.sessionstore.interval
* Preference Needs to be Created: No
* Preference Type: Integer
* Default Value: 10000
* Possible values:
o The number of milliseconds between session restore saving. For example, entering in 1000 would cause the session restore data to be saved every 1 second, whereas a value of 20000 would make it happen every 20 seconds.

SMS Spoofing

SMS Spoofing! This Is The Most Awaited TUT. And Exclusively In OUG....!!

And The Main Thing It's Add Free!


Steps:-
1. Go Here "http : //www . smswarehouse . com/html/sms-register . html"

2. Then Fill All Fields "REMEMBER - Give Accurate number in mobile number field with 91"

3. In
*First Name: Field Write The Number Or Any word From Which U Want To Send The SMS. "SENDER ID"

4. Then Fill The Remaining Fields.

5. You Will Receive a Activation Code On Your Mobile.

6. Log in to your account and fill The activation code. And You Will Get 10 free sms.

7. When You Will Send sms Through it it will shou sender name or number which you entered in
*First Name:column


Guys Enjoy SPOOFING!


And Please Say Thanks For Such A great Topic!

Wednesday 10 June 2009

Google tips


Below are some basic tips as well as some secrets that can be used on Google to help improve your search results and find things you may have never thought of.

  1. Group your search query to find better results. For example, if you're searching for computer help, you'll find better results if you search for an exact phrase by surrounding it in quotes: "computer help".
  2. If a lot of your results have keywords you're not search for use a minus sign. For example, if you're looking for computer help but don't want pages containing Windows type: "computer help" -windows
  3. Google supports number ranges, for example, if you're searching for computer help between the year 2000 to 2005 you can type: "Computer help" 2000..2005
  4. See the Google operators page, which lists dozens of the available operators Google allows. For example, the below search would search for URL that contains the word computer: allinurl: computer
  5. Visit the Google Features page, which lists hundreds of different examples of the type of things you can find through Google and how to find them.
  6. See our Google dictionary definition for a listing of dozens of other Google services.

Below are some more advance searches people are commonly looking for and what they do.

intitle:index.of + mp3 -asp -html -htm -php -pls -txt

In the above example, when entered into Google this search result looks for any index of MP3 files that does not contain the standard web pages like HTML, PHP, etc. or any other non-related pages. In the above example you can replace mp3 with avi or other file extension to search for these types of files.

intitle:index.of + mp3 "" -asp -html -htm -php -pls -txt

In the above example you could replace "" with the artists name, track, group, or name of the MP3 you're looking for. Keep in mind when downloading MP3 that you should own the track or song you're downloading otherwise it's considered illegal.

inurl:"ViewerFrame?Mode="

In the above simple example, Google will return results of insecure live web cams and with some of the services even allow you to control the cameras over the Internet.

The above three examples are just a few more advanced searches used to help illustrate how many different things can be found through Google.

Create short Internet addresses

Create easy to read and type Internet addresses from long convoluted addresses often found on popular sites such as Amazon, eBay, MapQuest, etc. by using online services that shrink the address. For example, the URL: http://tweaks2know.blogspot.com/would become: http://tinyurl.com/5bdmes. Below are examples of sites that allow you to copy and paste any URL into them to make them smaller.

Google 10 tips

Below is a list of our top ten Google tricks many users don't know about.

  1. Definitions - Pull up the definition of the word by typing define followed by the word you want the definition for. For example, typing: define bravura would display the definition of that word.
  2. Local search - Visit Google Local enter the area you want to search and the keyword of the place you want to find. For example, typing: restaurantat the above link would display local restaurants.
  3. Phone number lookup - Enter a full phone number with area code to display the name and address associated with that phone number.
  4. Find weather - Type weather followed by a zip code or city and state to display current weather conditions and forecasts for upcoming days.
  5. Track airline flight - Enter the airline and flight number to display the status of an airline flight and it's arrival time. For example, type: delta 123 to display this flight information if available.
  6. Track packages - Enter a UPS, FedEx or USPS tracking number to get a direct link to track your packages.
  7. Pages linked to you - See what other web pages are linking to your website or blog by typing link: followed by your URL. For example, typinglink:http://tweaks2know.blogspot.com/ displays all pages linking to This blog.
  8. Find PDF results only - Add filetype: to your search to display results that only match a certain file type. For example, if you wanted to display PDF results only type: "dell xps" filetype:pdf -- this is a great way to find online manuals.
  9. Calculator - Use the Google Search engine as a calculator by typing a math problem in the search. For example, typing: 100 + 200 would display results as 300.
  10. Stocks - Quickly get to a stock quote price, chart, and related links by typing the stock symbol in Google. For example, typing: msft will display the stock information for Microsoft.

Thursday 1 January 2009

Create Ghost Bootup CD from 2 Floppies

This trick shows you how create a Ghost bootup CD from two floppy disks. The instructions based on Ghost 8, but similar procedures can be done on different versions of Ghost.


Why?

Symantec Ghost is an utility to backup/restore hard drives and partitions. The backup feature requires a "fresh" bootup that is done by using bootup disk(s). This way, no Windows programs are executed providing the backup process a full access to all files and folders, including system files.

Because of this, Symantec Ghost normally comes with a bootup wizard which allows users to create the bootup disks; however, the wizard only allow you to create bootup floppy disks, and in many situations, you would have a tough time using the floppies. The reasons can be the speed, bad performance, or the lifetime concern of the floppy disks... Would it be cool if you can create a CD out of those floppies and worry free?

This page does not provide instructions how to create Ghost boot disk, it only helps you how to create a bootup CD out of the two floppies. For instructions how to create Symantec Ghost Boot Disk, click Here.

Use this trick at your own risk.


Here's how

  1. Create the two Ghost bootup floppy disks. (Click Here for details).

  2. Let's call the first bootup floppy is "Disk #1" and the second disk is "Disk #2".

  3. With "Disk #1", Create (if not already exists) a file called "mouse.ini".

  4. With "Disk #1", open the file "mouse.ini" with Notepad, and add the following lines:
    [mouse]
    MouseType = PS2


  5. To enable the CD-ROM driver (so that the CD-ROM can be accessible), search for the files "OAKCDROM.SYS" and "MSCDEX.EXE" from your computer and copy them to "Disk #1".
    If you cannot find these files, you can download them here, then extract them to "Disk #1".

  6. With "Disk #1", open the file "CONFIG.SYS", then edit this file so that it looks like follows. (Note! If you created the the bootup floopy disks WITHOUT a network driver, use only the first and the last line from below, remove all the lines which start with "DEVICE=\net\")
    DEVICE=OAKCDROM.SYS /D:mscd001
    DEVICE=\net\protman.dos /I:\net
    DEVICE=\net\dis_pkt.dos
    DEVICE=\net\EL90x.dos
    LASTDRIVE=Z:


  7. Still with the same file, edit the line "DEVICE=\NET\EL90x.dos" above to the appropriate driver file.
    (Note! "EL90x.dos" is a driver file for 3COM 90x NIC. Look under the "net" folder of your first floppy to find out the right name of this driver file. This file only exists in the first disk if the floppy set has been created with Network option).

  8. With "Disk #1", open the file "AUTOEXEC.BAT" with notepad. Edit the file to have it loads the CD-ROM driver, mouse driver, and launch GHOST.EXE as example below.
    (Note! If the bootup is not Network enable, remove the line "\net\netbind.com").

    Sample AUTOEXEC.BAT file:

    @echo off
    SET TZ=GHO+08:00
    mscdex /L:D /d:mscd001
    MOUSE.COM
    \net\netbind.com
    echo Loading Ghost...
    D:
    cd \ghost
    GHOST.EXE -nousb


  9. Create the CD with bootable option. This can be done with any recording software (i.e. Nero).
    Use "Disk #1" as boot image.

  10. Create a new folder on the CD contents, called "ghost", then add the executable file "Ghost.exe" into the folder from "Disk #2" ("Ghost.exe" must be in the "ghost" folder since we have created the "AUTOEXEC.BAT" script to look for this file there.)

  11. Congratulation! the CD you have created is a Symantec Ghost bootable CD. As long as you have CD-ROM bootup enable, you can use this CD to bootup your computer and use the Ghost tools.

Command Prompt on Right-Click

Many computer users, specially the programmers, need to launch a command prompt window every once in a while to execute some dos/shell commands. The problem is, when a command prompt window launched, the default path is normally the system path or the user profile's path. The users will then have to do all the "cd" commands to change the directories to the path he/she wants.

This trick shows you how to add an option called "Command Prompt" when you right-click on a folder in Windows. With this option, a Command Prompt Window will launch and its current directory will be the path to the folder you've selected.

Use this trick at your own risk.

Here's what you'll get:


The Solution
You can either edit your registry OR download the registry file and apply it on your computer.

Method I. Manually edit the registry:

  1. Start > Run
  2. Enter "regedit" and hit Enter
  3. Expand to "HKEY_LOCAL_MACHINE\SOFTWARE\Classes\Folder\shell"
  4. Right-click on "shell" and select New > Key
  5. Make sure a new key is created under "shell". Change the name of this key to "Command Prompt"
  6. Right-click on this new key "Command Prompt" and select New > Key
  7. Change the name of this key to "command"


  8. Double-click on the "(Default)" text on the right window to bring up the edit box
  9. Enter this text into the Value Data field:
    cmd.exe "%1"
  10. Click OK and close the registry.

Method II. Download and apply the registry file:

  1. Download this registry file Here
  2. Unzip it to a temp folder, then double-click on the .reg file to add the registry data.

Any Folder as a Photo Folder


This trick shows you how to setup any folder to display its contents as a photo folder. In many cases, you save your images/photos in a folder different than "My Pictures" (under "My Documents"). Since this folder you choose is just like any other normal folders, its contents displayed as a listing of files. You can temporary change it by just right-click and select "View" >> "Thumbnails". But if you want to change the folder so that everytime you come back, the folder itself, as well as all its subfolders, display the contents as photo thumbnails.

Here's How

Right-click on the folder you choose and select "Properties"


Select "Customize" Tab. Then under "Use this folder type as a template", select "Pictures (best for many files)"
http://thecomputertricks.com/tricks/000011/images/002.jpg

  • Check on "Also apply this template to all subfolders" to apply the setting to subfoders as well

  • Click OK to exit