Showing posts with label tips. Show all posts

Sunday, 6 November 2011

Trick For How To Hide Your Profile On Facebook

Are you fed up with everyday unwanted friend request or want to hide your profile from unknown people then you can hide your profile in facebook and google search.Whenever someone type your name or email Id in facebook search it will automatically search into its database and will show link to profile.

Is It really Possible to Hide Profile from facebook  search?

Yes,you can hide your facebook profile from facebook search.Basically facebook provides you with three options as follows:-

1. Everyone can search your profile on facebook

2. Only Your friends and friends of friends can search your profile

3. Only your friends can search your profile

For those who are really frustrated by daily unwanted friends request should select either 2 or 3 option.

Here is the complete step by step tutorial with screenshots on How To Hide Your Profile On Facebook

1.       Login into your facebook account.

2.       Click on Account on top right side.

facebook hide Trick For How To Hide Your Profile On Facebook

3.       Now Click on Privacy and then on View Settings Under Connecting on Facebook heading

facebook hide2 Trick For How To Hide Your Profile On Facebook

4.       Now you will see a lot of privacy settings and the first one being Search for you on Facebook

5.       In front of Search for you on Facebook you can select any one of the three options from the drop-down box as per your need.

facebook hide3 Trick For How To Hide Your Profile On Facebook

6.       You can also change your other privacy settings from here.

Saturday, 22 October 2011

Tips And Tricks About Facebook Timeline

Recent Timeline feature on Facebook has been applauded by most of the users generally. This new feature, though many think has security concerns, yet has changed the Facebook design for good as the response of the users has been more on the positive side. Timeline not only makes your profile look better but it seems to be a moving mosaic of photos and videos with so much information at a single place arranged in order of date and time. This surely makes the users spend more time checking out their friends profile to see what they did when.

If some of the readers have not yet changed to the new profile they can get started with this feature just by clicking the link below.

TIMELINE

Anyways this new feature needs some taking to. So here are some easy tips and tricks with pictures to help you make best of this new Timeline feature.

1. View All Your Timeline Content

tips7 Tips And Tricks About Facebook Timeline

Facebook’s mysterious algorithm decides which stories will showcase on your Timeline.

However, it also includes half-hidden posts. Posts that are marked on your Timeline, but not displayed, are noted by a blue dot on the central line. You can view these posts by clicking on the individual blue dots.

A quicker method is to click on the three blue dots underneath each year. This gives you the option to view all stories within that year.


1. Hide Stuff From Your Timeline
tipshide Tips And Tricks About Facebook Timeline

As we’ve pointed out, the Timeline gives friends the ability to view your entire Facebook history.

For this reason, we imagine the first thing most people will want to do is to “sanitize” their Timeline. The good news is, it’s simple to hide what you don’t want showing.

When you see a post you’d like to nix, just hit the pencil icon at the top of the post and select “Hide from Timeline.” This doesn’t delete the content from your account, but it will keep it safe from prying eyes.

3. Customize Your Favorites Boxes

tipsboxes Tips And Tricks About Facebook Timeline

Next up is the ability to customize the boxes that appear under your cover photo. The “Friends” and “Photos” boxes are fixed, but you can play around with the others.

To edit the boxes, click on the small arrow icon on their right. All boxes that can be moved or removed will have a pencil edit icon appear as you hover.

Hitting on the pencil brings up edit options to remove or swap boxes. To add a Facebook app, or one of the new social apps, click on the plus sign on an empty box.


4. Hide the Sidebar

tips Tips And Tricks About Facebook Timeline

You can make Timeline look even less cluttered by hiding the sidebar.

To do this, click on the arrow icon at the very bottom right of your screen. The sidebar will collapse, but leave the adverts to bug you — although, we’ve got a tip for those too…


5. Get Rid of an Annoying Advert

tips11 Tips And Tricks About Facebook Timeline

If a specific ad is really bothering you, simply adios it from your display.

Hover over the advert and click the “X” that appears at the top right. This gives you the option to hide it or hide all ads from that advertiser.

If you choose to hide the ad, Facebook gives you the further option to tailor what kind of ads appear on your account.

6. Change an Album’s Primary Photo

tipsprimary Tips And Tricks About Facebook Timeline
Albums you’ve created will show up in your Timeline. However, you can change the large, or “primary” image.

Click the pencil edit icon to select a different image from the album that will appear in the big window.


7. Feature a Post on Timeline

tips33 Tips And Tricks About Facebook Timeline

Make certain posts appear larger on your Timeline so they take up a double column space.

To do this, click the star icon in the top right corner of the post. You can minimize large posts the same way.

8. Customize Your Subscription Updates
tips44 Tips And Tricks About Facebook Timeline

When you subscribe to someone’s public updates, Facebook defaults to “Most updates.” You can change this.

Either go to the person’s profile and click the “Subscribed” drop down menu or, more efficiently, go click your “Subscriptions” favorites box (under your cover photo). This gives you a bird’s-eye view of the people you’ve subscribed to.

Now, if you hit the “Subscribed” box for each person you can tailor exact updates.

9. View Your Private Activity Log
tips55 Tips And Tricks About Facebook Timeline

If you’ve hidden items from your Timeline, but still want to review all of your Facebook content, look to your private Activity Log. Click on the “View Activity” box under your cover photo.

Now, by selecting a type of content from the “All” drop down menu, you can browse all your past Facebook activities, organized by date.

10. View Your Profile Through Someone Else’s Eyes
tips6 Tips And Tricks About Facebook Timeline

As with the former version of Facebook, you can view how others see your Timeline.

Click the cog icon under your cover photo; then select “View as…”

You can now enter a friend’s name or click on the “public” hyperlink to see how stranger’s view your Timeline.

11. How to Poke
tip Tips And Tricks About Facebook Timeline
Facebook has downgraded the famous “poke” in the new Timeline design.

If you still want to “poke” your Facebook buddies, you have to head directly to their profiles. Under a friend’s cover photo, next to the “Message” box, there’s a cog menu. Click this and you’ll see the option to poke. As always, use wisely.

Best Facebook Trick update via iphone5 using Desktop

You might have seen some feeds on Facebook in which it will be displayed below update from some friend as  “Updated via iPhone” or “Updated via Blackberry” etc. This is because, when ever someone update their Facebook profile status from some featured devices like iPhone, Android, Blackberry, A line will be added below their update on feeds which display from which device the update was made.

But here is a trick from which you can update from any device of your choice without even having any device. ;)

i.e. You can update your Facebook profile status via iPhone 5 even without having it ;) anyway iPhone 5 is not yet launched by apple. But you can update via iPhone 5.

update via iPhone 5 on Facebook

How ?

You can update your profile by using the an app developed on Facebook developers platform , which updates your status message with a fake device info.

Update your status via following devices. Log in to Facebook and open any of these links to update via respective devices.

Thursday, 13 October 2011

How To Close Non-responsive Programs By This PC Trick

computer , irresponsive


 Today I am going to share with you all a new pc trick to close a program automatically which is not responding. Many time my PC get hanged because some of my program not responding properly and then I have to turn off my computer. This will cause disturbance in the work. If your PC have the same problem then you can use this computer trick to get rid of this.
With a small registry tweak, Windows XP can be set to automatically close any program that 'stops responding' (crashes), eliminating the need for you to use the task manager to close down the offending software manually.
What you have to perform this pc trick:
1).Go to RUN and double click on it.
2).The you have to write REGEDIT in it.
3). Now your registry editor will open, Now double click  on HKEY_CURRENT_USER then choose CONTROL PANEL option after this choose  DESKTOP option as shown below in the screen shot os this pc trick.
4).Modify the REG_SZ entry AutoEndTasks with a value of 1.
That’s all . You have done with this pc trick. Try it and close non responsive program automatically.

Monday, 15 August 2011

How to move from Blogger Blogspot to WordPress – Step-By-Step Guide

Matt Mullenweg, the founder of WordPress, has said that 1,000+ bloggers migrate each day from Google’s Blogger Blogspot to WordPress.
Google plans to change the name of Blogger to Google Blogs and integrate it with Google+, so this might be the time for you to transfer your Blogger blog to WordPress as well.

WordPress – biggest blog platform

WordPress is the most popular blogging software. Over 50 million people have chosen WordPress to power their blogs and use it to create beautiful and professional blogs.
WordPress is free and it is built by hundreds of community volunteers. WordPress features thousands of free plugins and design themes to help you make your blog stand out.
WordPress is ready to welcome the Google Blogspot bloggers. A free tool has been developed to import posts and comments from your Blogger account into your WordPress site.
“Blogger Importer” WordPress plugin has been used by more than 100,000 bloggers already!

Move from Blogger to WordPress

It is simple to move your Blogger Blogspot blog to WordPress. Here is the quick 7 step process:
  1. Install a WordPress.org blog 

  2. In your WordPress Admin go to Tools – Import.

  3. Click “Blogger” and on the pop-up click “Install Now”.

  4. Click “Authorise” to tell Blogger to let WordPress access your account.

  5. This will transfer you to a Google Account page. Click on “Grant Access”.

  6. You will see the posts and comments on your Blogger blog. Click “Import”.

  7. Assign the imported posts to your author name on your WordPress blog.

Your Blogspot Blogger posts and comments are on WordPress now – welcome to the world of WordPress!

Saturday, 30 July 2011

Get free facebook likes g +1's with tweers.com

These days two third of internet users have profiles on social networks so every one of those who are on any network always like to grow their community. Major social networks likes Facebook and twitter have pulled attention of users by giving attractive things all the time especially the incentives to increase their networks. Now Google has jumped into social arena and this race has become bit interesting.
Companies are always investing in social networks to promote their services so users with large networks always get opportunity to earn big on these websites. Question is how to increase your networks rapidly and monetize your accounts? Answer is tweers.com

What is Tweers?

Tweers is a community of people all around the globe who use twitter, Facebook, YouTube and Google+ and come here to grow their networks through mutual exchanges.  Every user on tweers.com earn points for his activities like watching movies, following other twitter users, liking Facebook pages or giving plus ones to any webpage.
You can use these points to gain similar following for your networks like you can get unlimited free Facebook likes on tweers, unlimited Google plus ones for your website to increase its search engine rankings, grow your twitter followers or gain more views on your YouTube videos.


Tweers is absolutely free to join with incentive of 50 bonus points for referring other users.
How tweers is different from others?
In addition to these major services tweers has an additional option for blog owners to socialize their blog posts and gain more traffic. You can add your blog story on tweers and get free diggs, stumble upons, retweets and facebook likes. This is absolutely new thing in growing social communities for bloggers to gain extra benefit in terms of traffic. 
Apart from its free service tweers is always giving away from coupon codes to users

Friday, 29 July 2011

5 Ways to download photos from Facebook

1. Photo Download
In our opinion this method is the best way to download entire albums from friends in just a few clicks. Photo Download is a web-based, no installation required, allow it via Facebook to be used on any browser and operating system.
To use it just go http://socialphotodownload.com/ and login with Facebook.
20080225-1
2. PhotoGrabber
This software is available for Windows and Mac that lets you download albums with a few clicks of our friends including the comments and tags on photos.
pg-R74
Download: Windows - Mac
3.  Extension for Google Chrome
If you use Google Chrome this will make you comfortable that this extension is integrated to the browser. To download all photos on a page just hit Ctrl + S. Download the extension


anonymous
4.  Firefox Extension
Similar to the plug-ins for Chrome users here is the one for Mozilla Firefox. ( link )
This fits into the context menu of the operating system. Just right click on a page with the photos you want to download.


How to find out if someone uses your login on Facebook

Only recently has this been on Facebook, a new approach that allows you to be alerted whenever you log on (with your login and password) from a computer other than your own.
So if your mischievous little friend stole your password and logged on pretending to be you, or you suspect that someone else is using your login to Facebook as well as, I advise you to change your password as soon as possible (go here and click on "change" next password) here is how to set security access to be alerted to your account from different computers:
  • Click here to go to the Settings page of your account

  • Click edit to the right of "Account Security" and the question you want to receive notifications relating to access of new devices? Reply YES

  • Click "submit"


    From this moment you will receive an email when a new computer will need to login with your login information, you can also be alerted via SMS. Remember, the first logout & login Facebook will ask you to name your computer to register it as safe.

Friday, 22 July 2011

How to Remove esnips Toolbar and Search Engine


esnips-logoEsnips is one of the popular file sharing services available on the web. In order to download files from esnips, you need to download the ‘esnips downloader‘ software. This software by default changes the default search engine in all your web browsers (Firefox, Chrome etc.,) which is annoying and it slows down your system performance.

In order to completely remove the esnips software and toolbar, you can un-install the esnips download software from your system control panel. And, in un-install the ‘esnips downloader extension‘ if you are using Mozilla Firefox.

firefox-extension-esnips-downloader
In order to remove the esnips search engine from your web browser, if you are using Mozilla Firefox, in the browser address bar -> type about:config and search for esnips.

esnips-firefox
And them, right click on alluser set‘ under the ’status’ column and click on reset (as in the following image).

reset-config-values-firefox
Once you change the above values to default, the default search engine will be restored in your browser. To sum up, if you feel that the esnips toolbar and search engine are annoying then, uninstall the enips downloader software from your control, uninstall the esnips toolbar from your web browser and restore the enips search engine in your web browser to default.

Monday, 11 July 2011

STICKY NOTES TEXT FORMATTING IN WINDOWS 7

The Sticky Notes application is a very simple and useful application in Windows 7. It can be used to keep notes of To-Do Lists etc.

Launch StikyNot.exe and you can type notes at the keyboard

Customization can be done by right clicking a note to change its color, clicking the + sign on the note title bar to add another note and clicking a note and press Alt + 4 to close the note windows.

Notes are preserved even if you restart your Windows.

Text in a sticky note can be formatted using the shortcut keys:


Microsoft Internet Explorer Shortcut Keys

The followings are short-cuts for Microsoft Internet Explorer. Some keys are version specific

Use at your own risk.

Mouse shortcuts


Shortcut Description
Double-click (On a word) Select the word.
Triple-click Select entire line.
Wheel click Activate the Smooth scrolling
Hold Ctrl + Scroll Wheel forward Increase font size
Hold Ctrl + Scroll Wheel backward Decrease font size
Click one point then hold Shift & click another Create a selection from the two points


Keyboard shortcuts


Shortcut Description
F1 Help.
F3 Toggle on/off search panel.
F4 Pull down address bar.
F5 Refresh current page.
F6 Move focus to address bar.
F11 Toggle on/off full-screen mode
Alt + (Left Arrow) Go back on history. Same pas Backspace
Alt + (Right Arrow) Go forward on history.
Ctrl + A Select All.
Ctrl + B Favorites.
Ctrl + C Copy Selected.
Ctrl + E Search panel.
Ctrl + F Find (on page).
Ctrl + H Toggle History panel.
Ctrl + I Toggle Favorites panel.
Ctrl + L Open File. Same as Ctrl + O
Ctrl + N Open New browser window.
Ctrl + P Print current page / frame.
Ctrl + R Refresh. Same as F5
Esc Stop (while page is loading).
Ctrl + Enter Auto complete a url address. For example, type thecomputricks in the address bar and press CTRL + ENTER to get http://www.thecomputricks.com.
Ctrl + D Add the current page to favorite.

Simple Trick to Display Windows Version on Desktop

Simple Trick to Display Windows Version on Desktop Simple Trick to Display Windows Version on Desktop

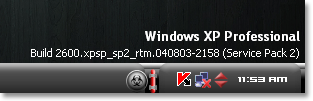
Most of you might have noticed Windows version on the desktop in the lower right-hand corner during beta releases of windows.Lets now see a quick trick on doing this in your windows platform.I tested this registry hack in Windows Xp, Vista and Windows 7 and its working fine icon smile Simple Trick to Display Windows Version on Desktop

Steps to show windows version on Desktop

1. Goto Start –> Run (Windows Key + R)

2. Type Regedit and hit Enter.

3. In Registry editor, navigate to this key:

HKEY_CURRENT_USER\Control Panel\Desktop

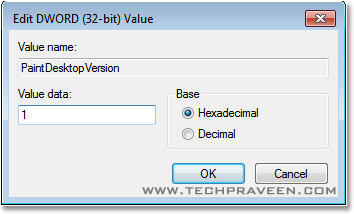
4. Select “Desktop” in left pane and search for “PaintDesktopVersion” in right pane and double-click it.

Show windows version on Desktop Simple Trick to Display Windows Version on Desktop


5. A dialog will pop-up, change the “Value Data” field from 0 to 1.

Show windows version on Desktop Registry Hack Simple Trick to Display Windows Version on Desktop


6. Restart the Windows you will find Windows version printed on the desktop.

Trick to Display Windows Version on Desktop Windows 7 Simple Trick to Display Windows Version on Desktop

Check Windows version on the desktop in the lower right-hand corner. icon smile Simple Trick to Display Windows Version on Desktop

Note:

If you wish to remove the watermark, just change the “Value Data” field back to 0.


Credits:http://www.techpraveen.com/2011/04/simple-trick-to-display-windows-version-on-desktop.html

Monday, 4 July 2011

9 Must-Know Facebook Tips

Most Recent/Top News

9 Must-Know Facebook Tips – Geeks.comSo you think you’re hot stuff because you have 4,396 “friends”. Wow, your news is reaching a lot of people. Not. Facebook doesn’t necessarily serve up everything you post to everyone on your friends list. In the top right hand corner of your News Feed you’ll see Top News/Most Recent. The default is Top News.

Using its own blend of secret sauce, Facebook serves up what it determines is most noteworthy for you to view - which friends are indeed the most engaged with you and Facebook in general. If they post quite often, “like” things and share, chances are you’ll be seeing them in your feed. If you want to be seen, interact and engage with your Facebook community. We’ll uncover more about this secret sauce in the next Tech Tip.

If you’d like to see everything that is being posted by your friends, then click the Most Recent tab. To have some control over what appears, click the drop down tab there and you’ll be able to select from Status Updates, Pages, Photos, Links and more. The Edit Options link will let you choose who you’d like (or not like) to see posts from.

Pro Tip:

9 Must-Know Facebook Tips – Geeks.com

Another way to pare down what you see is to organize your friends into Lists which is one of the options on that drop down menu. Start by going to http://www.facebook.com/friends. Click create a List and add the friends you want to group. If you then go to Edit My Profile and click on Featured People. Under Featured Friends you can now add the group or list you just created. Save your changes and return to your profile. You’ll see your Lists on the left hand nav bar for easy access.

Tagging

In addition to tagging people in photos, you can tag your friends or pages that you follow in your status updates. The great thing about this is that your status post will then appear on the Wall of that person or page. It used to require first using the @ sign, as in Twitter, to tag someone else. Facebook will now intuitively offer suggestions for you to choose from. 9 Must-Know Facebook Tips – Geeks.comIf that doesn’t happen, you can still access the list by using the @ symbol. Once you’ve made your choice the name will be highlighted and hyperlinked to their Facebook profile or page. If you don’t want to show the person’s full name, you can always delete the last name and the hyperlink will remain.

One new controversial Facebook tool is facial recognition in photos. This simplifies the somewhat tedious tagging process that enables you to connect a face in a photo with an actual Facebook friend. Again, Facebook provides suggestions for individuals in photos for you to choose from.

9 Must-Know Facebook Tips – Geeks.comSome privacy advocates have concerns that this feature is enabled by default. here’s how you disable it:

1. Go to your privacy settings.

2. Click “Customize settings.”

3. Scroll down to “Things others share.”

4. Find “Suggest photos of me to friends.

5. Edit accordingly.

You do have the option of untagging photos you've been tagged in by going to the photo and then click your name. There is no option to prevent friends from tagging you in photos, but you can prevent others from seeing the photos via your tagged name by adjusting your privacy settings.

Banner Me Up

9 Must-Know Facebook Tips – Geeks.com

You’ll notice a row of 5 images at the top of your profile. They are 97x68 thumbnails of pictures that you’ve been tagged in. If there is an image that you don’t want displayed, simply hover over it until you see an ‘x” in the top right hand corner. Click the “x” and the image is hidden but not deleted. This feature allows you to control your “banner”, so to speak. You can create your own using Photoshop, Picnik or some other image editing software. You start with a 485 x 68 banner and divide it into five 97x68 images. You will then tag yourself in each image but the key to remember is that the last image tagged will show on the left hand side. There are apps out there to help you create something fun or representative of you such as Profile Banner or Banner Maker.

Facebook Places

9 Must-Know Facebook Tips – Geeks.comMuch like Yelp, Gowalla and Foursquare, Facebook Places lets you “check-in” to locations using a smartphone. You can tag yourself or other friends as well. We haven’t heard much about Facebook Places yet but stay tuned.

What’s Happening

Facebook is currently testing a new feature called the “Happening Now” feed on a very small percentage of Facebook users. It allows you to see what your friends are commenting on and “liking” in real time. Facebook has a habit of rolling out new features with no warning, so you never know what you might see when you log in. Rumor has it that Happening Now is going to replace the Most Recent tab we discussed earlier. Some changes aren’t always well accepted but let’s face it, it’s free and Mark Zuckerberg can do whatever he wants.

Secure Connection

9 Must-Know Facebook Tips – Geeks.comIt’s a little known fact but Facebook does offer secure browsing (https) as an opt-in feature. When you enable this, all of your activity on Facebook becomes encrypted, making it harder for anyone else to access your information without your permission. (Not yet an option for mobile) The only possible downside is that this feature MAY impede your ability to access iframe content on Facebook pages. Turn on secure browsing by going to your Account Settings page.Click the "Change" link next to Account Security, check the box under "Secure Browsing (https)" and then click the "Save" button.

Privacy

No matter what your privacy settings, as recent news events have demonstrated, what’s posted on Facebook doesn’t stay on Facebook. Exercise some caution and good judgement. If you have second thoughts and want to cancel a post, or if you “drunk posted”, you can delete it by hovering over your comment and clicking the “x” in the top right hand corner. The movie was called “Social Network” for a reason, it allows you to share just about anything and everything within your community. It’s your responsibility to oversee what limits you want to place on that sharing of information. If you don’t want Facebook to share your phone number or home address, then don’t give it to them. There’s no requirement for such personal data to have a Facebook profile. Do yourself a favor and periodically review your privacy settings to make sure they are in alignment with your comfort zone for sharing.

The Job You Save May Be Your Own

9 Must-Know Facebook Tips – Geeks.comSecurity and Privacy take on a whole new meaning when you learn, as reported by Forbes, that in June 2011 the Federal Trade Commission gave its stamp of approval to a background check company that screens job applicants based on their Internet photos and posts.The FTC determined that Social Intelligence Corp. was indeed Fair Credit Reporting Act compliant.This means a search of what you’ve said or posted on Facebook/Twitter/Flickr/blogs etc., may become a standard part of job application background checks.

If that doesn’t make you reconsider posting those f-bombs, bong pictures and semi-nude images, I don’t know what will.

You’ve Got A Friend and a Friend and a Friend...

9 Must-Know Facebook Tips – Geeks.com

Let’s say you’ve maxed out at the 5,000 friends that Facebook allows you to have. Do you really know that many people? There are instances of Facebook cutting you off even before you hit the magic number. Once you’re done, you’re done. No amount of deleting “friends” will free up space for new people. So choose wisely when accepting that next friend invitation.

If you’re really using Facebook to promote yourself or your business then you should consider setting up a Facebook page where you can have an unlimited number of fans.

Saturday, 28 May 2011

8 Essential Tricks For Publicists Using Facebook

Social recent rash press conference inspired us to compile these tips to help public relations professionals from social media sites.


Thursday is the best day of the week to get the most visibility to a post on Facebook.


Publications great stories in the morning. If you send between 11-4 pm EST, are in danger of content to get pushed down to news feeds, and other traffic.


After breaking stories, including a full link is - is 300 percent more likely to receive clicks of a shorter address.


Use the buttons to send to your site such as Facebook.


Want the secret of the "new top" of his friend RSS? It is based on an algorithm known as Edge Traffic. Use words like "today" and "limited time" to increase their lead the rankings.


A recent study conducted by the Pew Research Center for Excellence in Journalism, Facebook is one of the factors that lead to 21 traffic news sites. So when you share a great history of the media, do not forget to take advantage of the first social network.


Want to know which words are the most "awarded" for Facebook? Try words like "best," "more," and those that explain, for example "why" and "how".


Facebook can be a better platform to make a video go viral as other platforms of social media, probably because the site makes it easy to integrate multimedia content into a message.


Hey, public relations professionals, do you have other tips to help increase the commitment of Facebook?


Wednesday, 25 May 2011

How to Display Facebook Statuses on WordPress Blog

add fbstatus wp How to Display Facebook Statuses on Wordpress Blog

If you want to show your Facebook Statuses and you are hosting on a WordPress.com blog that restricts you from installing plugins, try this. The following method make use of Facebook status feed and WordPress RSS widget. It will also work for self-host WordPress blogs, but you guys who self-host can use better plugins for that.


Step 1

Login into Facebook. Under Profile, look for Mini Feed column, click on See All.

minifeed seeall How to Display Facebook Statuses on Wordpress Blog

Step 2

Under Mini Feed, click on ‘Status Stories‘ on the right column. Scroll all the way to the bottom, look for ‘My Status

my status How to Display Facebook Statuses on Wordpress Blog

Step 3

Copy the link of My Status, and we are about to use this in WordPress blog. Your link will look something like the following:

minifeed link How to Display Facebook Statuses on Wordpress Blog

Step 4 (WordPress)

Under WordPress admin, Navigate to Design -> Widget. Look for RSS Widget, add it to your side bar.

rss widget How to Display Facebook Statuses on Wordpress Blog

Step 5

Paste the copied URL inside, give it a name, save and your Facebook statuses (or status depends on how many you display) will now appear on your WordPress blog.

rss facebook How to Display Facebook Statuses on Wordpress Blog

How to Download Facebook Photo Albums

FacePAD: Facebook Photo Album Downloader allows you to download your friends’ facebook albums, Events albums, and Group Albums, en masse, with the click of a button.

facepad 20 Facebook Tips/Tricks You Might Not Know